7 min read
You’re standing at your kitchen counter, espresso machine humming, hoping this shot won’t gush or choke like the last one. You tamp the coffee, but you’re not sure if you pressed too hard, too soft, or just right. Tamping seems simple—pressing coffee into a puck—but it’s one of the biggest factors in pulling a balanced, rich espresso at home. This guide breaks down exactly what tamping espresso means, why it matters, and how to get it right, so you can stop guessing and start pulling better shots.
Get the basics down: What tamping espresso actually means
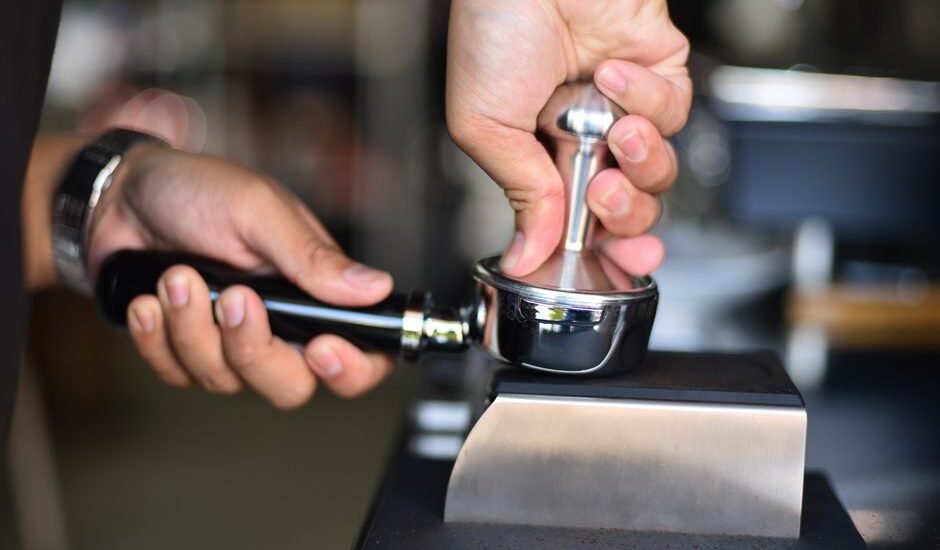
Tamping espresso is the process of compressing ground coffee in the portafilter basket before brewing. The aim: create a level, compacted puck that resists the flow of pressurized water. This resistance forces water to extract flavors evenly through every particle of coffee. If tamping is uneven or inconsistent, water finds the path of least resistance—leading to channeling, sour or bitter flavors, and thin crema.
Home espresso machines typically use 9 bars (130 psi) of pressure. That’s a lot of force. Without a properly tamped puck, you’re almost guaranteed to get uneven extraction. Tamping isn’t about brute strength; it’s about evenness and consistency. Most guides recommend pressing with 20-30 pounds (9-14 kg) of force, but the real goal is a level, smooth surface and consistent resistance shot after shot.
Choose the right tamping tool for your home setup
There’s more than one way to tamp espresso, and the tool you use can impact your results. Here’s how the main categories of tampers and tamping aids stack up for home brewers, with a focus on real specs and what matters in day-to-day use.
| Tool Type | Typical Diameter | Pressure Control | Weight | Skill Required |
|---|---|---|---|---|
| Basic Flat Tamper | 49–58 mm | Manual (user-controlled) | 200–400 g | Moderate |
| Calibrated Tamper | 51–58.5 mm | Spring-loaded (set to 30 lbs) | 350–600 g | Low |
| Distributor/Leveler | 53–58.5 mm | Manual, distributes grounds | 300–500 g | Low |
| Palm Tamper | 53–58 mm | Manual (palm grip) | 250–400 g | Low |
| Automatic Tamping Station | 58 mm only | Electronic (adjustable to 10–30 kg) | 3–5 kg | Very Low |
Related Guides
- Our guide to Manual Espresso Levers That Are Actually Worth Buying
- The Best Compact Espresso Machines for Small Kitchens and Home Setups
- Espresso Machines for Home Use, Reviewed
- The Best Stovetop Espresso Makers, Reviewed and Ranked
- How to Adjust Espresso Machine Pressure: A Step-by-Step Guide
- How to Backflush an Espresso Machine: A Step-by-Step Guide
- Browse all Espresso & Milk →
A basic tamper is usually included with home espresso machines, but upgrading to a calibrated or palm tamper can immediately improve consistency. Distributors (also called levelers) are popular for prepping the grounds before tamping, especially if your grinder tends to clump. Automatic stations are rare in home setups due to cost and bulk, but they offer absolute consistency with minimal effort.if you’re thinking of upgrading your tamping tool.
Spot the difference between good and bad tamping
How do you know if your tamping is actually working? Here’s what to look for:
- Even resistance: Insert the portafilter into your machine. If it feels tighter or looser than usual, your puck may be over- or under-tamped.
- Shot time: Standard double shots (18–20 g coffee) should pull in 25–35 seconds at 9 bars. Faster means weak puck compression; slower means too much force or grind is too fine.
- Crema quality: A well-tamped puck produces thick, even crema. Thin, spotty crema often signals uneven tamping or channeling.
- Spent puck appearance: After brewing, the puck should knock out as a firm, dry disc. Soggy or cratered pucks suggest issues with tamping or distribution.
It’s normal to tweak your tamping technique as you dial in grind size and dose. Don’t expect perfection on your first try. Keep your routine consistent—same force, same motion, same tamper—and you’ll see more reliable results fast.
Common mistakes to avoid
- Using a tamper that’s too small or too large: A tamper that doesn’t match your basket diameter (e.g., using a 51 mm tamper in a 58 mm basket) leaves loose grounds at the edges, causing channeling and sour shots.
- Inconsistent tamping pressure: Pressing harder or lighter each time leads to unpredictable shot times and flavors. A calibrated tamper or scale can help you standardize your force.
- Skipping distribution: Not leveling the grounds before tamping allows air pockets, which make water flow unevenly and ruin extraction.
- Over-tamping: Pushing down with excessive force (over 40 lbs/18 kg) compacts the puck so much that machines struggle to push water through, risking channeling or machine damage.
- Neglecting to clean the basket rim: Grounds left on the rim prevent a good seal, leading to leaks or messy group heads. Always wipe the rim before locking in the portafilter.
Dial in your tamping routine for home espresso
Here’s a straightforward, step-by-step process to improve your tamping at home:
- Weigh your dose: Use a scale to measure grounds (e.g., 18 g for a standard double).
- Distribute evenly: Tap the portafilter gently or use a distributor tool to level the coffee bed.
- Tamp flat and firm: Hold your tamper level and press down with 20–30 lbs (9–14 kg) of force. If you’re unsure, use a bathroom scale to calibrate your feel.
- Check the surface: The puck should be smooth and level edge-to-edge. Adjust your technique if it’s slanted or cracked.
- Wipe the rim: Remove any stray grounds for a proper seal with the group head.
- Lock in and brew: Insert the portafilter and start your shot immediately.
Consistency is more important than raw strength. Pick a routine and stick to it. If you want to make tamping nearly foolproof, consider a calibrated or palm tamper. See today’s deals to find tools that fit your machine and workflow.
Should you upgrade your tamper or stick with the stock one?
The tamper that comes with most home espresso machines is often plastic, light, and undersized. It works, but rarely well. Upgrading to a heavier, properly sized tamper (matching your basket’s inner diameter to within 0.2 mm) gives you more control and a better seal. Calibrated tampers take the guesswork out of pressure, while distributors help fix uneven grounds before tamping.
Upgrading makes the biggest difference if you’re chasing café-style consistency or dialing in single-origin beans that can be finicky. For casual espresso, a proper fit and a steady hand are enough.if you’re ready to move beyond the freebie tamper.
How tamping fits into the bigger espresso picture
Tamping is just one variable in espresso prep, alongside grind size, dose, and water temperature. Even perfect tamping won’t save a bad grind or stale beans. But once you’ve dialed in your grinder (aim for a fine, powdery texture—think table salt) and your dose (measured in grams), tamping is the last step that brings it all together.
For a deep dive into espresso technique, try resources like Home-Barista, where you’ll find community-tested advice and advanced troubleshooting. But for most home brewers, nailing the basics of tamping delivers the biggest leap in shot quality.
Frequently asked questions about tamping espresso
How much force should I use when tamping espresso?
Aim for 20–30 pounds (9–14 kg) of downward pressure. You don’t need to muscle it—consistency matters more than maximum strength. If you’re unsure, press on a bathroom scale to get a feel for the right amount.
Is a flat or convex tamper better for home use?
Flat tampers are the most common and easiest to use for even, level pucks. Convex tampers can help minimize edge channeling but are less forgiving if your distribution isn’t perfect. For most home setups, a flat tamper is simpler and delivers more predictable results.
How long does a typical tamping routine take?
With practice, tamping should take about 10–15 seconds per shot, including distribution and wiping the rim. Rushing leads to mistakes, but there’s no need to stretch the process—speed and consistency come with repetition.
Distributor vs tamper — which is more important for beginners?
If you have to pick one, a properly sized tamper is essential. Distributors help level the grounds, but you can get decent results with careful tapping and finger-leveling. A good tamper, matched to your basket size, is the foundation for solid espresso at home.
Will a calibrated tamper fit any espresso machine?
No. You need to match the tamper diameter to your machine’s portafilter basket. Most home machines use baskets between 51–58 mm, but always measure yours before buying. An ill-fitting tamper leaves loose grounds and uneven extractions.
What’s the most common reason for channeling after tamping?
Uneven tamping or poor distribution are usually to blame. If the coffee bed isn’t level or there are air pockets, water will punch through weak spots instead of extracting evenly. Slow down, level the grounds, and tamp with steady, even pressure for best results.
Final thoughts: Is perfect tamping worth chasing?
Perfect tamping isn’t about brute force or fancy gear—it’s about repeatability. Once you settle on a technique and stick to it, your espresso shots will be more consistent, flavorful, and satisfying. Upgrading your tamper or adding a distributor can help, but even with basic tools, a steady hand and attention to detail go a long way. Treat tamping as a key step in your espresso ritual, not an afterthought, and you’ll taste the difference in every cup.
Last updated: June 2026 · How we cover this topic