
7 min read
Disclosure: As an Amazon Associate and eBay Partner Network publisher, we earn from qualifying purchases. This doesn’t affect what we recommend or how we describe it.
Pressing your espresso grounds as hard as you can isn’t the secret to a better shot—despite what you’ll read in most guides. The truth is, consistent tamping matters far more than brute force or fancy technique. The right approach with your espresso tamper can make or break your crema, shot time, and flavor clarity. Here’s how to get it right, whether you’re dialing in for the first time or fine-tuning your home setup.
Why Even Pressure Matters More Than Maximum Force
It’s easy to assume that tamping harder means better espresso. But over-compressing the puck can choke your machine, while uneven tamping leads to channeling—where water finds weak spots and ruins extraction. Consistency is key. You want a level, even puck that offers just enough resistance to the water, usually achieved with 20–30 pounds of pressure. Most home machines work best when you keep tamping pressure in this range, rather than maxing out your strength.
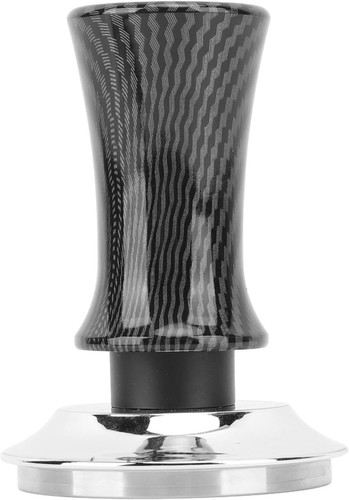
Comparing Espresso Tamper Types and Features
| Tool Type | Diameter (mm) | Weight (g) | Pressure Guide | Price | Best For |
|---|---|---|---|---|---|
| Basic Flat Tamper | 49–58 | 250–400 | Manual feel only | $ | Budget setups |
| Calibrated Spring Tamper | 51–58.5 | 350–500 | 20–30 lbs spring | $$ | Consistent tamping |
| Dual-Head Distribution Tool | 53–58 | 350–600 | Leveling + tamp | $$$ | Advanced users |
| Palm Tamper | 49–58 | 200–300 | Manual feel only | $ | Quick workflow |
Choosing the Right Tamper Diameter for Your Portafilter
Tampers come in sizes from 49mm up to 58.5mm, and the right fit is non-negotiable. Too small, and grounds escape up the side, causing channeling. Too large, and the tamper won’t fit at all. Measure your portafilter basket’s inner diameter with calipers or a ruler—don’t trust manufacturer “58mm” claims blindly. Aim for a tamper that’s 0.2–0.5mm smaller than your basket’s measurement for the best results. If you’re unsure, Compare current options to see which size fits your machine model and style.
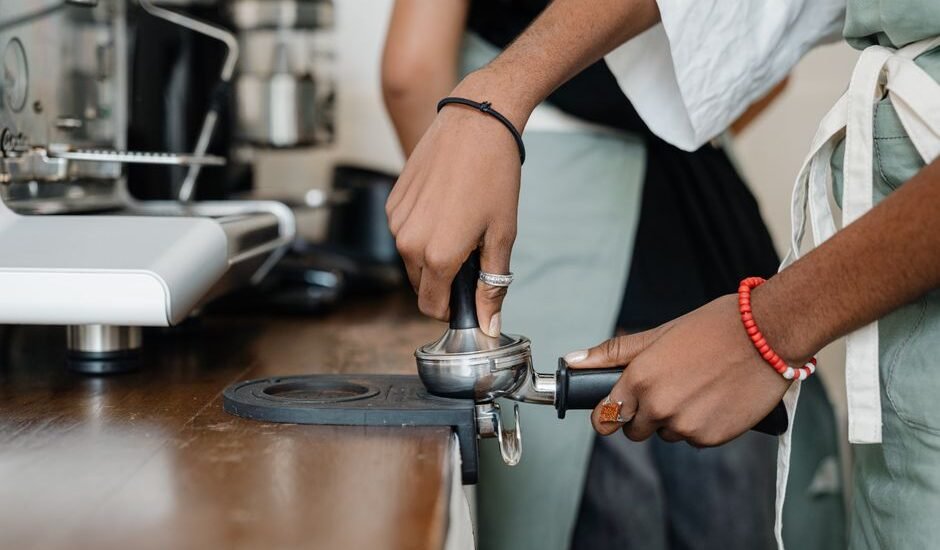
How to Tamp Espresso: Step-by-Step Guide
- Distribute grounds evenly. After dosing, gently tap or use a distribution tool to settle grounds flat and level in the portafilter basket.
- Grip the tamper with a straight wrist. Hold the tamper like a doorknob, keeping your wrist straight to avoid angling the puck.
- Apply consistent downward pressure. Press with 20–30 pounds of force—enough that the puck compresses but doesn’t compact into a brick. If using a calibrated tamper, press until it clicks.
- Polish with a light twist. After tamping, give a slight twist (just a few degrees) to smooth the puck’s surface. Over-twisting can disturb the puck’s edges.
- Inspect for levelness. Look at the puck from the side. If it’s slanted, adjust your technique or surface for next time.
- Clean stray grounds from the rim. Wipe the portafilter edge so grounds don’t break the seal in your group head.
Why Tamping Technique Affects Espresso Extraction
Uneven tamping lets water find shortcuts through loose areas, causing “channeling.” This leads to sour, weak, or unpredictable espresso. A level tamp creates uniform resistance, so water extracts flavor at the same rate through the whole puck. Even a single degree of tilt can throw off your shot. If you notice blonding (pale streaks) early in extraction, or wildly varying shot times, revisit your tamping technique.
Related Guides
- How to Use an Espresso Tamper: A Practical Guide for Home Brewers
- Our guide to Manual Espresso Levers That Are Actually Worth Buying
- Compact Espresso Machines for Small Kitchens and Home Setups
- Our guide to Espresso Machines for Home Use, Reviewed
- AeroPress vs French Press: Which Makes Better Espresso-Style Coffee?
- Our guide to Burr vs Blade Grinders for Espresso: What’s the Real Difference?
Beginner’s pre-purchase checklist
- Measure your portafilter basket’s internal diameter in millimeters—don’t guess based on machine specs.
- Check if your machine uses a pressurized or non-pressurized basket; some tampers won’t work well with pressurized systems.
- Decide if you want a calibrated tamper (with built-in pressure feedback) or a standard manual one—beginners often benefit from a spring-loaded model.
- Assess the tamper’s weight—heavier tampers (350g+) generally help with even pressure but may tire your wrist if you make several shots daily.
- Ensure the handle design is comfortable for your grip size; test if possible, or look for models with ergonomic handles.
- Consider a distribution tool if you struggle with clumping or uneven grounds before tamping.
- Look for a return policy or warranty, especially if buying from a new supplier; misfit tampers are a common issue.
Which Tamper Type Fits Your Workflow?
For daily espresso, a basic flat tamper is affordable and gets the job done if you’re careful about technique. Calibrated tampers with a spring mechanism help you learn what 30 lbs of pressure feels like and deliver repeatable results, especially if your shots vary from day to day. Dual-head tools combine distribution and tamping, speeding up workflow and improving consistency, but cost more. Palm tampers are quick and easy, especially for multiple shots, but may lack the feel and control some enthusiasts prefer. See today’s deals to find a tamper style that matches your routine and budget.
FAQs: Tamping Espresso at Home
How much pressure should I use when tamping?
Most home espresso setups work best with 20–30 pounds of downward force. This is enough to compress the puck without choking your machine. Over-tamping can slow extraction to a crawl, while under-tamping causes weak, under-extracted shots.
What’s the difference between a calibrated tamper and a regular one?
A calibrated tamper uses a built-in spring to stop or “click” at a set pressure, usually 30 lbs. This helps beginners develop muscle memory and ensures consistency. Regular tampers rely on your own feel, so results may vary until you build experience.
How long does it take to master tamping technique?
Most people develop a consistent tamp within 1–2 weeks of daily practice. Focus on keeping your wrist straight and checking for a level puck each time. Using a mirror or checking the puck from multiple angles can speed up your progress.
Flat vs convex tamper base—what’s better for home use?
Flat bases offer more uniform extraction with modern baskets and are easier for beginners to use. Convex bases can help avoid edge channeling in older or less precise baskets, but most home users see better results with a flat tamper in a well-fitted size.
What if my tamper doesn’t fit my portafilter perfectly?
A tamper that’s too small leaves loose grounds at the edge, leading to channeling. Too large, and it won’t fit at all. If you’re between sizes, choose a tamper just under your basket’s measured diameter. Some companies offer custom sizing—always check return policies in case you need to exchange.
Calibrated vs distribution tool—should I get both?
Distribution tools level and spread grounds before tamping; calibrated tampers standardize pressure. If you struggle with clumpy grounds or uneven extractions, a distribution tool can help. Some advanced tools combine both functions, but for most beginners, starting with a calibrated tamper is the best upgrade. View what’s available to compare combo tools with standalone tampers.
What warranty or return options should I look for?
Check for at least a 1-year warranty on mechanical parts for calibrated tampers. Return windows of 30 days are typical; many suppliers allow exchanges if you order the wrong size. Always read the fine print, especially for custom or specialty tampers.
Small Tweaks for Big Improvements: Advanced Tamping Tips
Once you’re comfortable with the basics, experiment with micro-adjustments. Try using a scale to practice hitting consistent pressure, or test out a distribution tool to reduce clumping. If your machine has a bottomless portafilter, watch the extraction for signs of channeling. Swapping out a lightweight tamper for a heavy (400g+) model can also improve stability for some users. For more on espresso technique, check resources like Perfect Daily Grind, which regularly features home barista tips and troubleshooting guides.
Final Thoughts: Your Tamper, Your Espresso
Mastering the espresso tamper is less about spending big and more about dialing in a technique you can repeat every morning. The right tamper—properly sized, comfortable in your hand, and matched to your basket—transforms your espresso routine. Don’t get caught up in hype or overcomplicate things. Focus on even, level tamping, and you’ll see improvements in every shot. Ready to upgrade your home setup? Check current prices for tampers that fit your portafilter and workflow.


Last updated: June 2026 · How we cover this topic